以下是在CentOS8安裝Nginx, MySQL, PHP環境:
- 僅透過DNF/YUM安裝Nginx, MySQL, PHP
- 配置CloudFlare Full (strict) SSL/TLS encryption mode
- 搭建WordPress
配置CentOS環境
1. 更新系統軟件包
dnf update
2. 創建用戶www
Nginx和PHP會以用戶www運行,不使用root以降低的安全風險
創建用戶組www,創建用戶www,分配到用戶組www並且不啟用登錄權限,不創建/home目錄
groupadd www
useradd --shell=/sbin/nologin --no-create-home --gid www www
3. 關閉SELinux
編輯 /etc/selinux/config 並設置 SELINUX=disabled
# This file controls the state of SELinux on the system.
# SELINUX= can take one of these three values:
#     enforcing - SELinux security policy is enforced.
#     permissive - SELinux prints warnings instead of enforcing.
#     disabled - No SELinux policy is loaded.
SELINUX=permissive
# SELINUXTYPE= can take one of these three values:
#     targeted - Targeted processes are protected,
#     minimum - Modification of targeted policy. Only selected processes are protected.
#     mls - Multi Level Security protection.
SELINUXTYPE=targeted
重新啟動以生效SELinux設置
shutdown -r now
安裝及配置Nginx
1. 安裝Nginx
dnf install nginx
2. 編輯 /etc/nginx/nginx.conf 修改和新增以下字段
- 配置Nginx以用戶www運行
- 啟用Gzip
- 隱藏Nginx版本資訊
- 設置上傳文件大小限制為8MB
# For more information on configuration, see:
#   * Official English Documentation: http://nginx.org/en/docs/
#   * Official Russian Documentation: http://nginx.org/ru/docs/

user www www;
worker_processes auto;
error_log /var/log/nginx/error.log;
pid /run/nginx.pid;

# Load dynamic modules. See /usr/share/doc/nginx/README.dynamic.
include /usr/share/nginx/modules/*.conf;

events {
    worker_connections 1024;
}

http {
    log_format  main  '$remote_addr - $remote_user [$time_local] "$request" '
                      '$status $body_bytes_sent "$http_referer" '
                      '"$http_user_agent" "$http_x_forwarded_for"';

    access_log  /var/log/nginx/access.log  main;

    sendfile            on;
    tcp_nopush          on;
    tcp_nodelay         on;
    keepalive_timeout   65;
    types_hash_max_size 2048;

    gzip on;
    server_tokens off;
    client_max_body_size 8M;

    include             /etc/nginx/mime.types;
    default_type        application/octet-stream;

    # Load modular configuration files from the /etc/nginx/conf.d directory.
    # See http://nginx.org/en/docs/ngx_core_module.html#include
    # for more information.
    include /etc/nginx/conf.d/*.conf;

    server {
        listen       80 default_serv......
3. 創建網站專屬的Nginx配置文件
創建檔案 /etc/nginx/conf.d/blog.nicklabs.org.conf
server{
        listen 443 ssl http2;
        listen [::]:443 ssl http2;
        server_name  blog.nicklabs.org;
        index index.html index.php;
        root  /var/www/blog.nicklabs.org;
        ssl_certificate /var/www/ssl/nicklabs.org.pem;
        ssl_certificate_key /var/www/ssl/nicklabs.org.key;
        ssl_client_certificate /var/www/ssl/origin-pull-ca.pem;

        ssl_verify_client on;
        ssl_session_cache        shared:SSL:10m;
        ssl_session_timeout      10m;
        ssl_session_tickets      on;
        ssl_session_cache builtin:1000 shared:SSL:10m;
        ssl_dhparam /var/www/ssl/dhparams.pem;
        ssl_protocols TLSv1 TLSv1.1 TLSv1.2 TLSv1.3;

        add_header Strict-Transport-Security "max-age=63072000; includeSubDomains; preload" always;

                include /etc/nginx/default.d/*.conf;

        location / {
                try_files $uri $uri/ /index.php?$args;
        }

        access_log /var/log/nginx/blog.nicklabs.org.log;
        error_log /var/log/nginx/blog.nicklabs.org-error.log;

        error_page 404 /404.html;
        error_page 500 502 503 504 /50x.html;
        location = /50x.html {
                root /usr/share/nginx/html;
        }
}

server
{
        listen          80;
        server_name blog.nicklabs.org;
        location / {
                rewrite ^/(.*)$ https://blog.nicklabs.org/$1 permanent;
        }
}
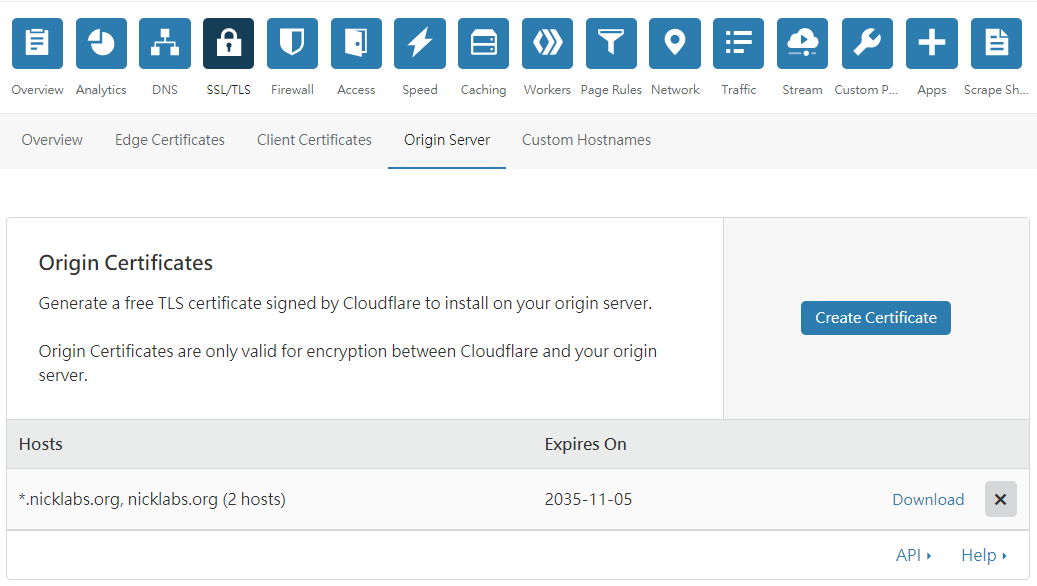
ssl_certificate ssl_certificate_key 在 CloudFlare 的 SSL/TLS → Origin Certificates 取得
- 將 CloudFlare 提供的
Origin Certificate儲存為nicklabs.org.pem - 將 CloudFlare 提供的
Private key儲存為nicklabs.org.key ssl_client_certificate的origin-pull-ca.pem在 CloudFlare 的 這裏 取得
生成 dhparams.pem,用途請參考 https://weakdh.org/
openssl dhparam -out dhparams.pem 4096
4. 設置Nginx開機自動啟動
systemctl enable nginx
5. 重啟Nginx生效設置
systemctl restart nginx
安裝及配置PHP
1. 安裝PHP
WordPress建議模組及必要模組的清單中列出需要php-imagick擴展,由於 CentOS 8 的默認源裏面沒有,根據WordPress的建議先以php-gd代替
dnf install php-cli php-fpm php-mysqlnd php-mbstring php-opcache php-pdo php-json php-gd php-xml php-pecl-zip

2. 編輯 /etc/php-fpm.d/www.conf 修改以下地方
- 配置PHP以用戶www運行
- 設置UNIX Socket 的 owner 為用戶www
; Start a new pool named 'www'.
; the variable $pool can we used in any directive and will be replaced by the
; pool name ('www' here)
[www]

; Per pool prefix
; It only applies on the following directives:
; - 'access.log'
; - 'slowlog'
; - 'listen' (unixsocket)
; - 'chroot'
; - 'chdir'
; - 'php_values'
; - 'php_admin_values'
; When not set, the global prefix (or @php_fpm_prefix@) applies instead.
; Note: This directive can also be relative to the global prefix.
; Default Value: none
;prefix = /path/to/pools/$pool

; Unix user/group of processes
; Note: The user is mandatory. If the group is not set, the default user's group
;       will be used.
; RPM: apache user chosen to provide access to the same directories as httpd
user = www
; RPM: Keep a group allowed to write in log dir.
group = www

; The address on which to accept FastCGI requests.
; Valid syntaxes are:
;   'ip.add.re.ss:port'    - to listen on a TCP socket to a specific IPv4 address on
;                            a specific port;
;   '[ip:6:addr:ess]:port' - to listen on a TCP socket to a specific IPv6 address on
;                            a specific port;
;   'port'                 - to listen on a TCP socket to all addresses
;                            (IPv6 and IPv4-mapped) on a specific port;
;   '/path/to/unix/socket' - to listen on a unix socket.
; Note: This value is mandatory.
listen = /run/php-fpm/www.sock

; Set listen(2) backlog.
; Default Value: 511
;listen.backlog = 511

; Set permissions for unix socket, if one is used. In Linux, read/write
; permissions must be set in order to allow connections from a web server.
; Default Values: user and group are set as the running user
;                 mode is set to 0660
listen.owner = www
listen.group = www
listen.mode = 0660

; When POSIX Access Control Lists are supported you can set them using
; these options, value is a comma separated list of user/group names.
; When set, listen.owner and listen.group are ignored
listen.acl_users = www
;listen.acl_groups =

; List of addresses (IPv4/IPv6) of FastCGI clients which are allowed to connect.
; Equivalent to the FCGI_WEB_SERVER_ADDRS environment variable in the original
; PHP FCGI (5.2.2+). Makes sense only with a tcp listening socket. Each address
; must be separated by a comma. If this value is left blank, connections will be
; accepted from any ip address.
; Default Value: any
listen.allowed_clients = 127.0.0.1
3. 編輯 /etc/php.ini
編輯第825行的upload_max_filesize為8MB
upload_max_filesize = 8M
4. 設置php-fpm開機自動啟動
systemctl enable php-fpm
5. 重啟php-fpm生效設置
systemctl restart php-fpm
安裝及配置MySQL
1. 安裝MySQL
dnf install mysql mysql-server
2. 啟動及配置MySQL
systemctl start mysqld
mysql_secure_installation
[root@centos ~]# systemctl start mysqld
[root@centos ~]# mysql_secure_installation

Securing the MySQL server deployment.

Connecting to MySQL using a blank password.

VALIDATE PASSWORD COMPONENT can be used to test passwords
and improve security. It checks the strength of password
and allows the users to set only those passwords which are
secure enough. Would you like to setup VALIDATE PASSWORD component?

Press y|Y for Yes, any other key for No: y

There are three levels of password validation policy:

LOW    Length >= 8
MEDIUM Length >= 8, numeric, mixed case, and special characters
STRONG Length >= 8, numeric, mixed case, special characters and dictionary                  file

Please enter 0 = LOW, 1 = MEDIUM and 2 = STRONG: 2
Please set the password for root here.

New password:

Re-enter new password:

Estimated strength of the password: 100
Do you wish to continue with the password provided?(Press y|Y for Yes, any other key for No) : y
By default, a MySQL installation has an anonymous user,
allowing anyone to log into MySQL without having to have
a user account created for them. This is intended only for
testing, and to make the installation go a bit smoother.
You should remove them before moving into a production
environment.

Remove anonymous users? (Press y|Y for Yes, any other key for No) : y
Success.


Normally, root should only be allowed to connect from
'localhost'. This ensures that someone cannot guess at
the root password from the network.

Disallow root login remotely? (Press y|Y for Yes, any other key for No) : y
Success.

By default, MySQL comes with a database named 'test' that
anyone can access. This is also intended only for testing,
and should be removed before moving into a production
environment.


Remove test database and access to it? (Press y|Y for Yes, any other key for No) : y
 - Dropping test database...
Success.

 - Removing privileges on test database...
Success.

Reloading the privilege tables will ensure that all changes
made so far will take effect immediately.

Reload privilege tables now? (Press y|Y for Yes, any other key for No) : y
Success.

All done!
3. 新增網站專用的Database和MySQL用戶
mysql -p
CREATE DATABASE `DATABASE-NAME`;
CREATE USER 'MySQL-USER-NAME'@'localhost' IDENTIFIED BY 'MySQL-USER-PASSWORD';
GRANT ALL PRIVILEGES ON DATABASE-NAME.* TO 'MySQL-USER-NAME'@'localhost' WITH GRANT OPTION;
GRANT PROCESS ON *.* TO 'MySQL-USER-NAME'@'localhost' WITH GRANT OPTION;
FLUSH PRIVILEGES;
exit
4. 設置MySQL開機自動啟動
systemctl enable mysqld
下載WordPress
前往WordPress官網: https://wordpress.org/download/
建議下載.tar.gz版本,在Linux系統解壓比較方便
1. 下載WordPress到網站目錄
cd /var/www/blog.nicklabs.org
wget https://wordpress.org/latest.tar.gz
2. 解壓縮 並刪除壓縮檔
tar xf latest.tar.gz
mv wordpress/* .
rm -f latest.tar.gz
3. 設置檔案權限
chmod -R 755 /var/www/blog.nicklabs.org
chown -R www:www /var/www/blog.nicklabs.org
chown -R www:www /var/lib/nginx
設置CloudFlare
1. 設置DNS並點亮橙色雲朵 (啟用CDN):

2. 啟用以下設置:
- Always Use HTTPS
- Automatic HTTPS Rewrites
- Authenticated Origin Pulls

完成
打開網址即會進入WordPress初始設置頁面


文章留言
你好,我在申請新增網站時會出現: is not a registered domain,請問這要怎麼解決??
@Ice-Man 看看Cloudflare KB:
https://support.cloudflare.com/hc/en-us/articles/205359838-I-cannot-add-my-domain-to-Cloudflare-